 |
| Ian's 1st Birthday Carnival |
Good morning!
Woke up this morning bright and early, and decided to take a shot at blogging about Ian's first birthday party. We had this party in December last year, but after the party was done and dusted, the last thing I wanted to do was to even talk about it! Well, the thought of going through thousands of pictures was such a turn off. And truthfully, I procrastinated because I was slightly gutted by the party... because... it was meant to be an outdoor party and... yes... you guessed it.... it rained. *
double sigh*
Anyway, fast forward to a month later, after lots and lots of shopping therapy, I can now turn around and give myself a pat on the back for a job well done (despite the rain), and thank my lucky stars that the rain decided to only drizzle instead of pouring cats and dogs.
This post is dedicated to the DIY ideas and decorations I made for Ian's party. (I'll write a separate post for the actual party.) I hope I inspire you to start DIY-ing your party. Vendor credits and web links at the end of the post!
 |
| The dessert table. |
My fellow loyal readers would know that I have been planning this circus party for years. It was meant to be Aiden's 4th birthday party, but what I didn't realise was that by 4 years old, he was wise enough to choose (and demand) his own birthday theme! So the circus props were just sitting in my party room, just begging to be used. Then Ian came along, so I decided to throw a circus carnival for his first birthday!
I wanted to try something new for the dessert setup. Saw the cute red luggage bags at Kaison and it inspired me to try a somewhat more rustic style for the table. A neighbour was planning a similar rustic wedding setup so she ordered the crates and graciously allowed me to borrow them! *
great neighbours*
So here goes! Enjoy the pictures!
 |
| DIY-ed this frame. Sew pleats on a red material then hot glued it to the back of the Ikea Nytja frame in blue. Made the paper fan and hot glued them to cover the "curtain" pull back. |
 |
| Printables "circus", (cupcake) topper and poster from a free printable available on the web (link below) |
 |
| The frame also acts like a photo frame - great for those Kodak moments. I had up to four people trying to cram themselves into the frame - super fun! And it is way cheaper than ordering those pre-ordered Instagram boards, don't you think? |
 |
| Next up, the dessert table! |
Browsing through my circus ideas on Pinterest, I found some pretty great dessert tables under a tent like structure. Since my patio already has a pelmet framing the glass window, I used red and white striped paper (from Ikea) to cover the glass. Then cut U shapes out of red and white paper to make the tent flaps. Made the tutu by sewing pleats from soft net. Stapled white ribbon all around to cover the sewn pleats. Since the soft net was not thick, I had to find a similar colour (in this case red) material to line the back so that you cannot see the table legs.
 |
| Since the striped paper was not wide enough, we had to cover the window using three long strips. We did such a good job, that it actually looked seamless; like one big piece! |
 |
| The layout. |
 |
| Ian's cake made with love. Chocolate cake with dark chocolate ganache filling. |
 |
| Placed the cake on top of the bigger red luggage bag for added height. |
 |
| Clown head cupcake toppers and clown candle from a local baking shop in town. Wooden letters from Typo. |
 |
| For the left side of the table, I made cupcakes in red/white striped cups and presented them in the cute ferris wheel cupcake stand. Other cupcakes were placed on the tent-like cupcake stand. Candy canes since it was Christmas season. Jelly beans in the red/white striped cups. Rock candy from Party City.Personalized candy bar too from the matching printable set. |
 |
| Loving this cute ferris wheel cupcake stand from Groupon. Ticket dispenser from Hobby Lobby. I placed the ticket dispenser on top of the cupcake stand on standby for use during the carnival games. It has a slit on the top and dispenses the roll of tickets contained within it. |
 |
| Note to self - next time buy more jelly beans to fill the striped cups to the brim! And bake more macarons please! *chuckle* |
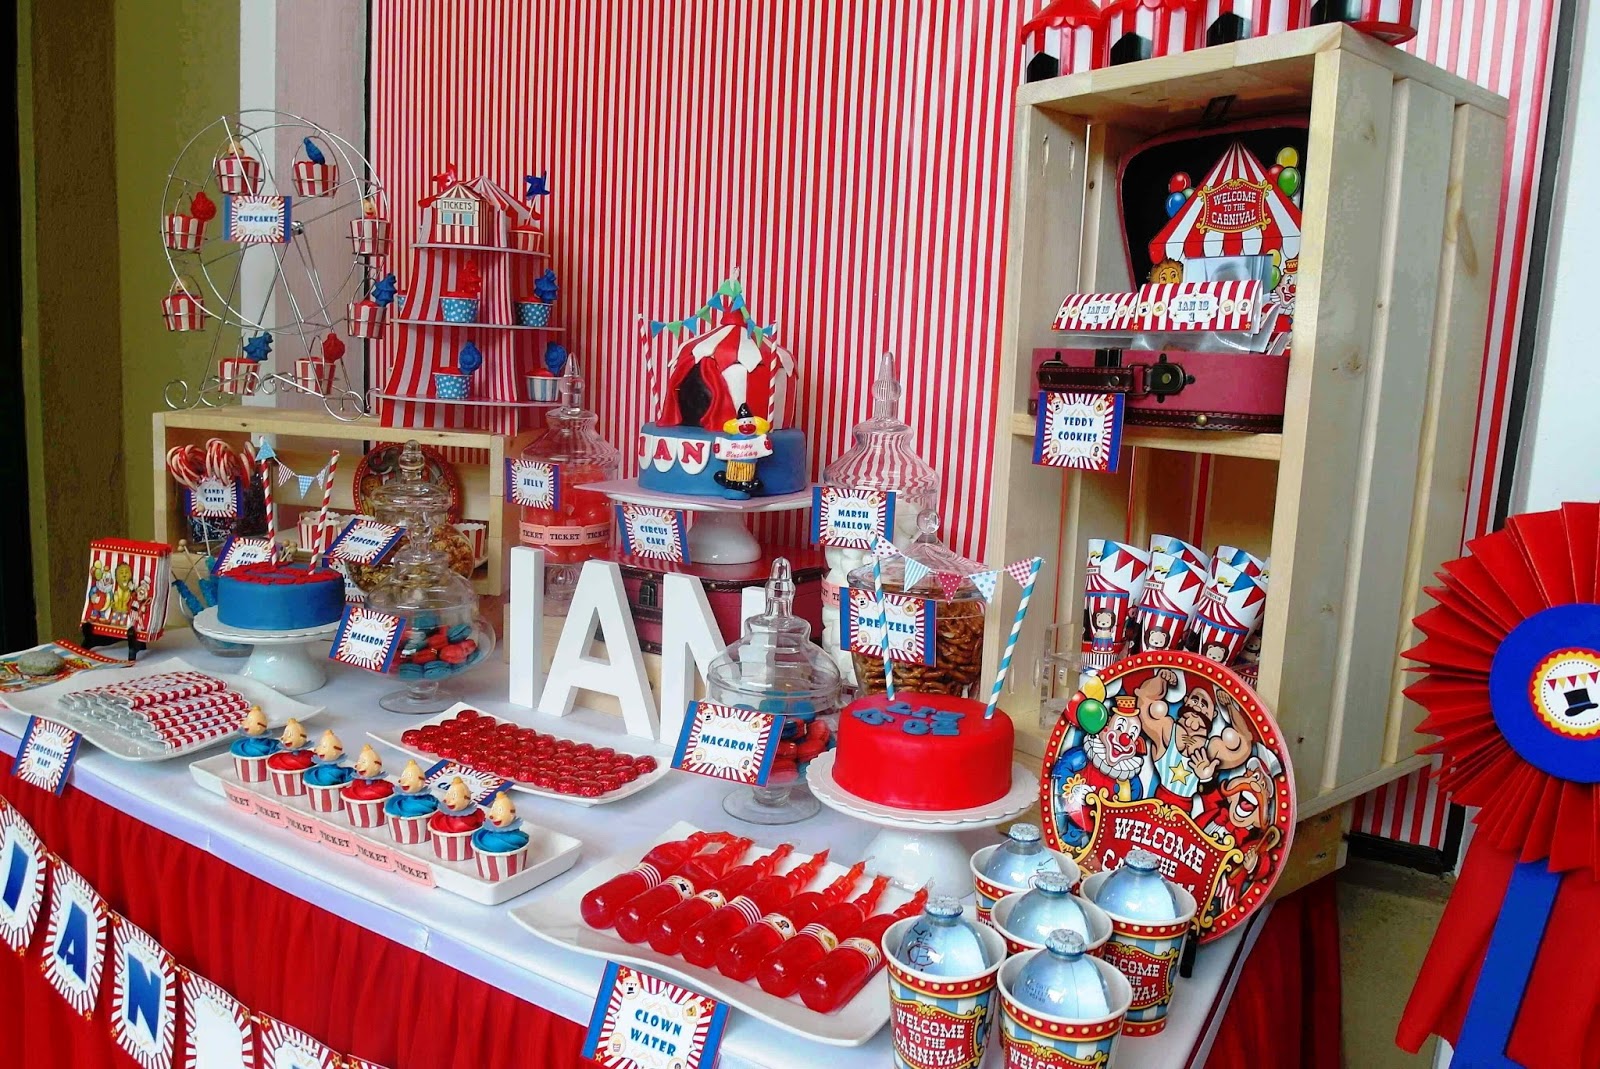 |
| For the right side of the table, I packed Choco Teddies into a cello bag and topped it with a personalized printable. These are the packets you see in the red luggage bag. Then I printed a circus inspired design and shaped them into cones, filled them with popcorn and tadaaaa... popcorn cones! Personalized jelly and water too! Circus tent tumbler at the top of the crate from Oriental Trading. |
 |
| Pre-packed teddy cookies and popcorn cones. |
 |
| Bought the acrylic holder a longggg time ago, it was sitting around unused because I didn't know what to use it for. Finally it became my popcorn cone holder! |
 |
| Filled my apothecary jars with jelly, marshmallow, Garrett popcorn, pretzels and homemade macarons. Adorned the jars with strips of tickets to match the theme |
 |
| A close up of the cake. |
 |
| It was actually a triple celebration! Since Ian and I share the same birth date, I took the opportunity to bake a cake of my own too. December is also our anniversary month... a good long 9 years with Hubby. (Wonder whether I should throw a 10th year anniversary party this year... *grin*) I made white cake with cream cheese filling... nyum! Striped paper straw from Shop at Gie's and pennant banner printable link provided below. |
 |
| Paper plates, tissues, napkins and paper cups all from the circus party range from Party City. Ordered this way back and handcarried them back home. Ahh the things I do for my sons' parties. |
Okay, enough shots of the candy buffet. Next, I wanted the party to have carnival games. If you are planning to replicate the same, make sure you have enough help. You will need help for supervising each game booth, distribution of tickets, and manning the prizes counter. For this party, thankfully I had my sibling, sister in-laws and neighbours who were
oh-so-kind to give a helping hand.
I hung three pieces of cloth from the pelmet of my living hall window, to demarcate the area for each game - Tin Can Toss, Ring Toss and Ball Toss Bonanza. I used a tree in the garden to hang the Pin The Nose on the Clown game and the clown shaped pinata. I printed instructions for each of the game for easy reference. For each game, everyone will get a maximum of three tickets to a minimum of one, depending on how they fare. So even if the ball you toss fails to go into any buckets, you still get one ticket so everyone is a winner!
 |
| The layout in the garden. I stuck to the colour palette of red, blue and yellow throughout the party. |
 |
| Circus tent from Lazada. Ikea sells a similar tent too! Can you see all the hanging origamis from the tree? |
 |
| Darling Hubby made each and everyone of those, then meticulously hung each of them from our trees! |
 |
| My neighbours worked till past 1am, hanging these balloons in our garden. Some of them were hung so high up, I don't know how they managed to reach those heights! |
 |
| The games area. Blue cones from Daiso. |
 |
| Loving the huge clown face! |
 |
| First up, Pin The Nose on the Clown. I printed red circle "nose" stickers and hand cut them (one by one) for this game. |
 |
| Tin can toss! Sent an urgent message to my neighbours urging them to save their condensed milk tins for this purpose. Printable link below - I just printed it and stuck it to the tin. Stress balls (you know, the rubber squeezable ones) were used to knock the tins down. Simple and cheap fun! |
 |
| Ball toss bonanza. I made use of multi coloured pails and ping pong balls for this game. |
 |
| Ring Toss game from Party City. |
I also had a Carnival Prizes Booth at the end of the games table. Kids could then exchange the tickets they won for a prize of their choice. I made sure I had enough prizes so that every child would go home with something. It was so much fun watching the kids trying their best to win tickets to go for the four top grand prizes!
 |
| The carnival prizes booth. |
 |
| I used crates to give height to the booth. Then crammed as much prizes as I could with the limited space I had! *grin* |
 |
| Carnival paper frame from Party City. Stuck it to an Ikea frame and placed it on every table. Printed the poster in black and white as a colouring activity for the smaller kids. It was a win-win situation, parents could eat in peace while the kids coloured! The crayons were from Tesco, I simple packed them into cello bags and topped them with a matching printable. |
 |
| What circus carnival party would be complete without popcorn??!! Popcorn from Kiddy Bounce. |
 |
| A bouncing castle just by my gate for the kids to jump around and release their pent up energy. Bouncing castle also from Kiddy Bounce. |
 |
| Last but certainly not least, we had a clown at our party. Seen here holding the clown pinata. |
Stay tuned for my next post of the actual party... and how we dived into Plan B when it rained. *
cries* Thanks for reading everyone!
Vendor credits and links:
- Printables from Printabelle (they're free!)
- Popcorn cone printable
- Tin can toss printable
- Tent cupcake stand, paper plates, tissue paper, cups and paper frames from Party City.
- Tent tumblers from Oriental Trading.
- Ticket dispenser from Hobby Lobby
- Ferris wheel cupcake holder from Groupon
- Red luggage bags from Kaison
- Wooden letters from Typo
- Striped paper straws from Shop at Gie's
- Mini bunting printable for the cakes from Allsorts (it's free!)
- Pin the nose on the clown and Ring toss game from Party City.
- Popcorn and bouncing castle from Kiddy Bounce

Hey, how much you rent the bouncing castle?
ReplyDeleteJenice :)
Hi Jenice, thanks for reading my blog. I rented the bouncing castle from Kiddy Bounce. Do contact them for their latest price listing. Good luck! ;)
DeleteI'm always amused everytime you post your party pics!! Good job there! I'm wondering do you print yourselves those part printables or you sent to shop for printing? What paper material do you normally use? I like doing DIY too but always having a hard time when it comes to printing. It doesn't look as good as the rest :D
ReplyDeleteHope you can share. Thanks!
Hello! I don't do any printing myself. I prefer to send them to a printing shop. Depending on the use, I usually choose art card for food tags, and glossy paper for personalized chocolate or water labels. Same as for stickers, I prefer to print on glossy sticker paper. Good luck with your DIY ;)
DeleteSalam, saya silent reader. Syiok pulakk baca blog ni.. do you plan all this by your own? *wow*
ReplyDeleteWsalam. Yes alhamdulillah saya plan semua nie sendiri. Minat kut hehehe and lebih puas hati kalau plan sendiri. Thanks for reading my blog! ;)
Deletetold u....u r so creative la sis. rajin plak tu. never missed to prepared party for your love 1. lucky u got space to do all dis. lucky husband & sons.
ReplyDeleteHahahaha lucky husband and sons eh? Bila turn I nak jadi lucky wife/mummy pulak? Thanks for the compliment dear. ;)
DeleteMay I know where to buy the crates?
ReplyDeleteThere is an FB page called Pertukangan Kayu DIY Malaysia. Contact any of the talented folks over there. They will gladly help you out (with a fee of course)...
DeleteHi.. May I knw where to get the crates?
ReplyDeleteThere is an FB page called Pertukangan Kayu DIY Malaysia. Contact any of the talented folks over there. They will gladly help you out (with a fee of course)...
DeleteHI LIZ - BEAUTIFUL, MIND SHARING YOUR BUNTING PRINTING CONTACT?
ReplyDeleteHi dear, I would love to help but which bunting are you talking about? ;)
DeleteHi there, I am trying to follow your "tin can toss" printable link, but I am not finding it! I only see a small square with the "A big top thank you" card. What did you use for the striped paper around the whole can? Can I print that somewhere? Thanks so much!
ReplyDeleteHi Jessica. What I did was I copied the image into Microsoft Word, then I 'snipped' the lines and pasted it to the original image to extend the lines all the way around the tin. Hope this makes sense? ;)
DeleteHi there
ReplyDeleteI am wondering how you made the tin can toss? I tried to follow the "printable" link you put at the bottom, but it did not have a tin can option. It had a gift tag option with just the tent in a square but not the striped lines all around the can. How did you do this? Is it something i can print?
Hi Jessica. What I did was I copied the image into Microsoft Word, then I 'snipped' the lines and pasted it to the original image to extend the lines all the way around the tin. Hope this makes sense? ;)
DeleteIncredible party! I'd love to know if the tickets signs for prizes was also a printable? I didn't see it as an option with the other carnival printable. Thanks!
ReplyDeleteHi, I bought a ticket holder from Party City, which came with a roll of tickets. So I scanned those tickets and printed them again to make more. You can try looking for sample ticket images online. Good luck ;)
DeleteHi! Love this! We are doing the same theme for my son's 1st carnival party. I am torn on the ticket prize booth and how best to handle. How did that whole process work?? Seems overwhelming, ha!
ReplyDelete